Before you start using the android studio first make sure you have Java Development Kit (JDK) version 1.6 or higher, if you do not already have it, please download the JDK via the address below
Download Java Development Kit on Windows
 |
| The Java Download button on the Java Downloads page (select Java Platform 8u60) |
After you click SDK, the next step is requires that you accept a license agreement by clicking the Accept License Agreement radio button. Then you must choose the appropriate JDK for your operating system. If you’re running Windows 7 or Windows 8, you should click the file link to the right of the Windows x64 label, for more details please look at the picture below
 |
| Accept the license agreement and click the appropriate link for Windows (file size 186,16 MB) |
Before you install the JDK, create a directory in the root of your C: drive called Java. The name of this directory is arbitrary, though we call it Java because many of the tools we are going to install here are related to Java, including the JDK, Android Studio, and the Android SDK. Consistently installing the tools related to Android Studio in the C:\Java directory also keeps your development environment organized.
Navigate to the location where your browser downloaded the installation file and execute that file by double-clicking it. Once the installation begins, you will be presented with the Installation Wizard, shown in Figure 1-3. In Windows, the JDK installer defaults to C:\Program Files\Java\. To change the installation directory location, click the Change button. We recommend installing your JDK in the C:\Java directory because it contains no spaces in the path name and it’s easy to remember.
 |
| Installation Wizard for the JDK on Windows |
 |
| Select the JDK installation directory |
The last step is to perform Configuring Environmental Variables on Windows, This section shows you how to configure Windows so that the JDK is found by Android Studio. On a computer running Windows, hold down the Windows key and press the Pause key to open the System window. Click the Advanced System Settings option, for more details please look at the picture below
 |
| please click on the button Advanced system settings |
 |
| click Environment Variables |
 |
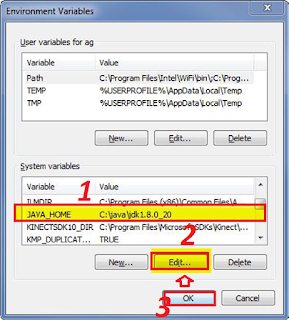
| select java home, click edit |
Be sure to type JAVA_HOME in the Variable Name field. In the Variable Value field, type the location where you installed the JDK earlier (less any trailing slashes). Now click OK.
Just as you did with the JAVA_HOME environmental variable, you will need to edit the PATH
environmental variable. Place your cursor at the end of the Variable Value
field and type the following:
;%JAVA_HOME%\bin
Now click OK, OK, OK to accept these changes and back out of the system properties. To test that the new JDK has been installed properly, pull up a command line by clicking the Start button, typing cmd, and then pressing Enter. In the command-line window, issue the following command and press Enter:
java –version
If you get a response like the one shown in picture below, congratulations. You just installed
the JDK properly. for more details please look at the picture below
thus the Installing the Java Development Kit on Windows, please see also the Installing Android Studio
Android Studio
Next Tutorial


